JupyterHub Handover Documentation
Overview
This project has been a proof of concept of how the STFC cloud team can provide a JupyterHub service for existing cloud users. Since Jupyter services are popular among the research community and are an easy way of setting up a Python development environment to develop aspects of code, it was decided it would be a good addition to the services offered, with the hope of making use of the STFC cloud.
The proof of concept instance uses LDAP authentication so users can login using the federal ID and password. When logged in, users can create one or multiple notebook servers. This makes use of the STFC cloud where a notebook server is hosted on one VM, giving good scalability.
Launching Test Instance
To launch the proof of concept, SSH into host-XXX-XXX-XXX-XXX.nubes.stfc.ac.uk and execute the following commands:
1cd /home/USERNAME
2source ssl_env
3source jupyterhub/venv3.6/bin/activate
4cd jupyterhub/test-hub
5jupyterhub
Using JupyterHub - User’s Perspective
The majority of the JupyterHub user experience is documented here: https://jupyterhub.readthedocs.io/en/stable/reference/urls.html. However, some specific notes for this instance:
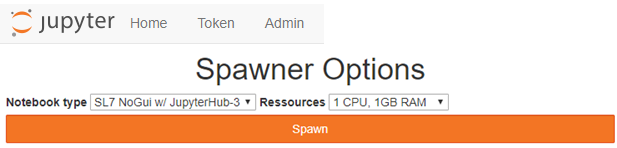
Once JupyterHub has been started, users can start to access it, XXX.XXX.XXX.XXX:8000 as per the current config. By default, this will send the user to hub/spawn, which gives options to create a new notebook server:
Clicking on the ‘Home’ button (top left of the page) will allow the user to see a list of their notebook servers. This will send the user to hub/home - I think this should be the user’s ‘homepage’.
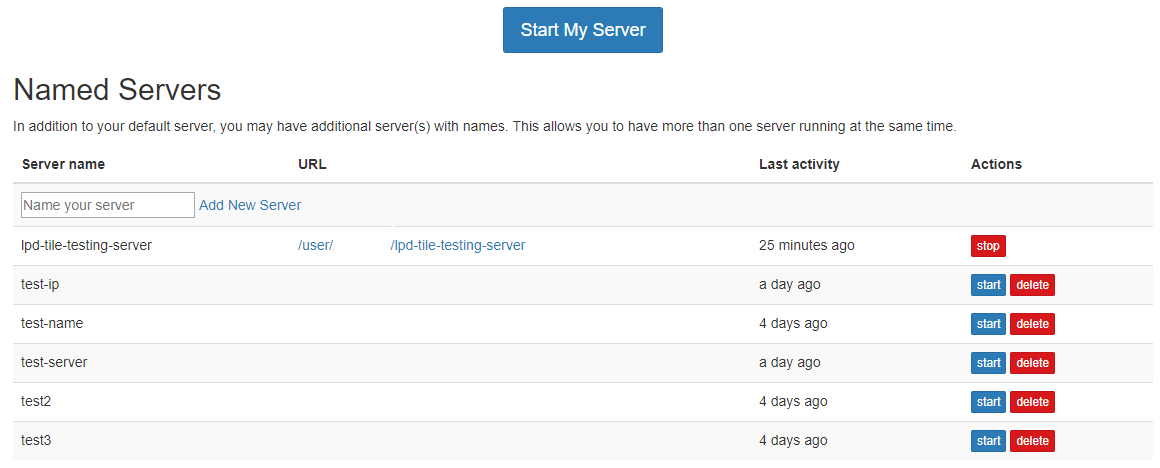
This homepage will show a list of the user’s named servers. Users can start, stop and delete these servers. To create a new named server, just type the name into the text field and click ‘Add New Server’.
There are two ways of making a notebook server in JupyterHub. You can create a named server as described above, or create a server using the ‘Start My Server’ button. Prior to named server functionality, this was the only way for users to create a notebook server. Servers created in this way aren’t part of the named servers and as such, won’t appear in that list. Using this method of server creation means you can only have one notebook server of this type. You can still use named servers of course. Essentially, why use this old functionality if you can make use of the named servers?
Sidenote, if the user cannot make use of the ‘multiple servers per user’ functionality, check the JupyterHub version. This wasn’t supported in UI format until version 1.0.0.
Setting SSL Environment Variable
In order to correctly setup the authentication, I needed to set an SSL key passphrase. Before the JupyterHub instance is started, an environment variable needs to be set so JupyterHub can make use of the passphrase. This is done in a small script called ssl_env. A small snippet of logging is shown below which highlights what to look for when the environment variable hasn’t been set before launching JupyterHub.
_tls_common.js:104
  c.context.setKey(options.key, options.passphrase);
[...]
RuntimeError: Proxy failed to start with exit code 1
Recreating Instance
JupyterHub requires Python 3 so I used Python 3.6 throughout for this proof of concept.
Inside /home/USERNAME/jupyterhub/test-hub, there’s a requirements.txt file which is the output of a pip freeze done on the virtual environment used for this proof of concept. If you don’t have access to this, I installed: jupyterhub, jupyterhub-ldapauthenticator and libcloudspawner using Pip.
To launch notebook servers on OpenStack, JupyterHub must be installed on the VM. The easiest way to do this is by creating a VM using an image that has it pre-installed. You will need to create an image which has JupyterHub (including Python 3.6) installed, along with any software required by your community and a ‘user folder’ - this is the intended base folder for notebook servers (this option is set in the jupyterhub config file). As of writing, this folder is /home/USERNAME/jupyterhub-user-folder.
This JupyterHub instance I used has a host certificate with it. This is because authentication uses SSL. A self signed certificate will work for testing or various tiers of more trusted certificates can be requested via cloud-support@stfc.ac.uk
It should be noted the project needs a security group to allow port 8000.
LDAP Authentication
For JupyterHub to function, a spawner and an authenticator is needed. These can be custom made, or a community made solution can be used. For the proof of concept, I’ve made use of community solutions.
The default authentication method is to use Unix accounts local to the host. Obviously, this isn’t a good solution for a service as big as the STFC cloud. The configuration for this authenticator has been based off the LDAP config for the STFC cloud web interface, but needed to be modified to work for this purpose.
There are two LDAP authenticators for JupyterHub: jupyterhub-ldapauthenticator (used in the proof of concept) and jupyterhub-ldap-authenticator. The latter is based on the prior, with support for multiple LDAP servers, among other things (full list of features shown here: https://pypi.org/project/jupyterhub-ldap-authenticator/). I decided to use the initial library due to better documentation (and existing users) and there appeared to be no need to have the additional features.
Beyond this demo, there could be plans to add further authentication choices. The next method to look at would be the IRIS IAM service. This uses OAuth authentication, which is the technology used by GitHub and Google to allow users to sign into other websites, using credentials from the respective services.
GitHub repo of the LDAP authenticator: https://github.com/jupyterhub/ldapauthenticator
An OAuth authenticator has already been written: https://github.com/jupyterhub/oauthenticator
Information about the IRIS IAM service: https://iris-iam.stfc.ac.uk/privacypolicy/
LibCloudSpawner
A good introduction to spawners is written on JupyterHub’s documentation: https://jupyterhub.readthedocs.io/en/stable/reference/spawners.html
As touched upon in the overview, this spawner allows scalability of the service. Instead of putting strain of the user’s demands on the host VM, this allows a single VM per notebook server. Currently, there’s only functionality to create these VMs in a single project. I use the Packer service account to create VMs, simply because this is an account I had easy access to at the time. A separate service account should really be made for this work. The VMs are created in a specific project because this is where the JupyterHub host VM is placed and for proof of concept, it wasn’t worthwhile to spend the time moving the VM outside of this project.
I put my key on the VMs (ex_keyname in the config) so I can get into them if needed. If this service went further, giving the cloud team the ability to access users VMs in case of something going wrong would be vital.
When VMs are created, it’s not exceptionally clear which VMs link to which notebook servers. I got confused on the small scale of 6/7 VMs I had up at a time, so an improvement needs to be made to prevent confusion on a larger scale. Even just a mapping between VM name/UUID and notebook server name (formatted as ‘username/notebook-server-name’) would help a great deal. A limit of number of servers per user can be added, though isn’t currently configured.
I’ve been communicating (via Gitter) with the developer of this spawner to get assistance on how to set it up and get things working. I’ve also been submitting issues to the GitHub repo which he responds to and pushes out updates fairly quickly. This could be useful in the future to add new functionality.
GitHub repo: https://github.com/tristanlt/jupyter-libcloudspawner
ReadTheDocs: https://jupyter-libcloudspawner.readthedocs.io/en/latest/index.html
Gitter Conversations: https://gitter.im/jupyter-libcloudspawner/community
Example Notebook Server - LPD Tile Testing
To ensure this instance works, I got an existing Jupyter notebook to function with JupyterHub. This notebook takes data files from a detector, and tests the tiles/chips on the detector function as they should.
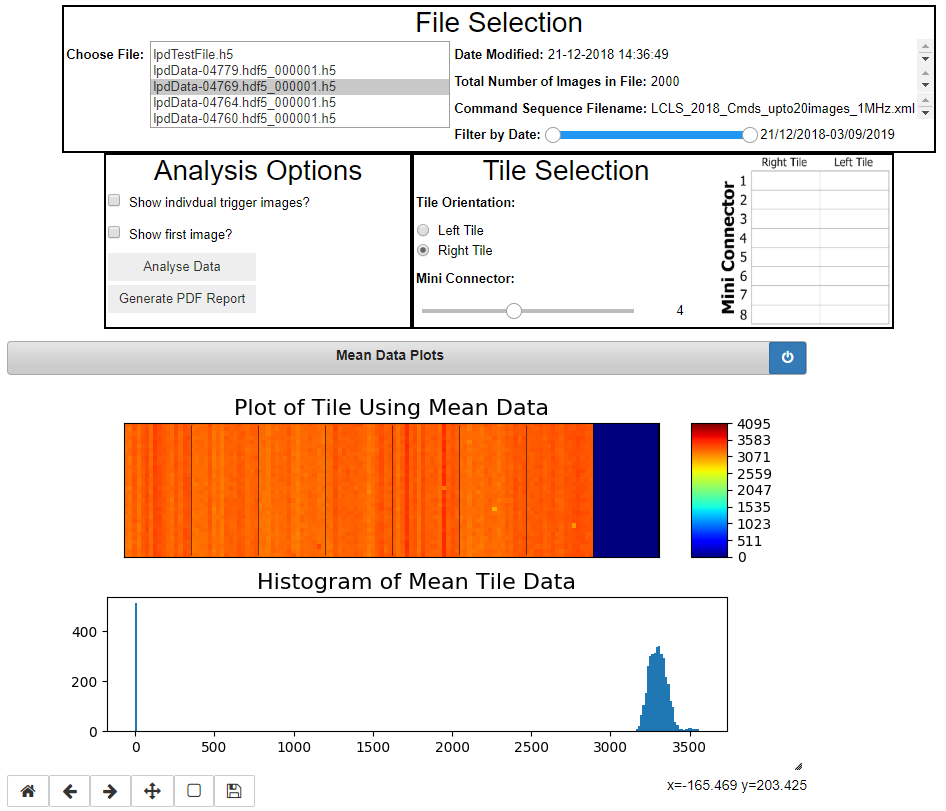
As per the screenshot, the notebook functions as expected and displays a number of data visuals. This notebook requires certain Python libraries to function. In order to make it work, I SSH’d into the VM and installed them via Pip. If the cloud team don’t want end users accessing those VMs via SSH, users can create terminals within JupyterHub. However, some thought might need to be given if users aren’t allowed to access certain parts of the VMs. At the very least, management of images/allowing users to have a Python environment that’ll work for them will be important.
GitHub repo of the notebook from the state I used: https://github.com/stfc-aeg/lpd-tile-testing/tree/b3378da7c86e3810523485343e4642de0ec3ca28
Config Notes
When first starting JupyterHub, a config file is generated for you. I’ve used this file and appended to it as required. Anything that’s important has been un-commented and made use of, but to summarise:
c.JupyterHub.cleanup_proxy = False
c.JupyterHub.cleanup_servers = False
When the JupyterHub service is shutdown, this means notebook servers won’t be deleted. In the case of the LibCloudSpawner, VMs won’t be changed at all (deleted, for example).
c.JupyterHub.ssl_cert = 'file.crt'
c.JupyterHub.ssl_key = 'file.key'
The certificates from e-Science come in a .pem format. I converted this to a crt and key to fit with JupyterHub’s configuration.
c.Spawner.start_timeout = 360
6 minutes is enough time to ensure OpenStack has done its job and beyond that, something has definitely gone wrong. The timeout used to be 90 seconds and this wasn’t always enough time for the spawner to get an IP address from the VM it created.