Volumes in OpenStack
A volume is a detachable block storage device, similar to a USB hard drive. You can attach a volume to only one instance. Use the openstack client commands or the Web Interface to create and manage volumes.
You can also snapshot a volume to act as a backup or template for creating new volumes.
Create Volume
You can create a new volume using either the Web Interface or the CLI. You can also create volume from a snapshot. A snapshot is a mechanism where you to create a new image from a running services which serves as a templating and backup mechanism.
Web Interface
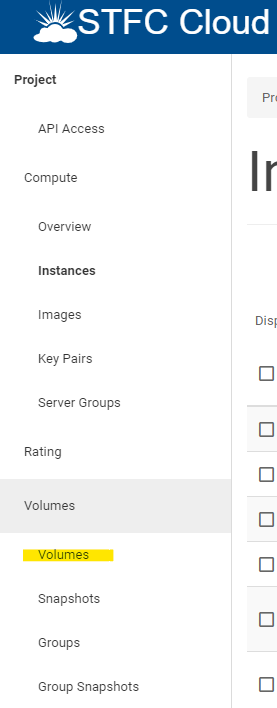
Log-in to the STFC cloud (https://openstack.stfc.ac.uk/)
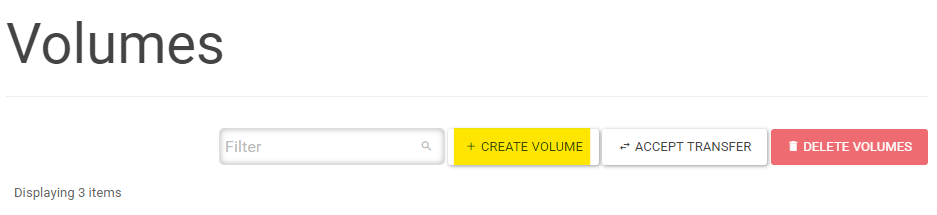
In the Web Interface, Go to Volumes → Volumes
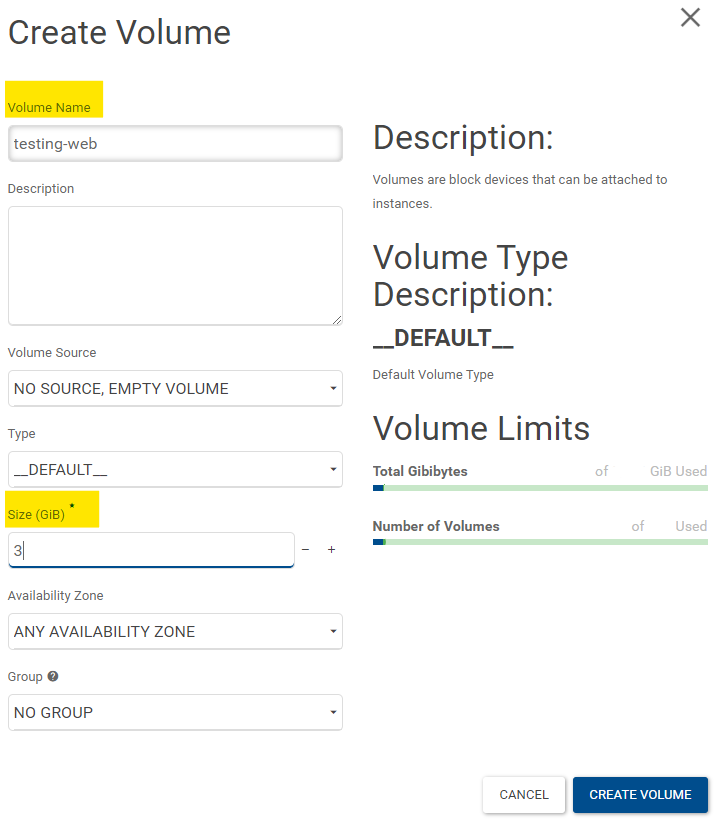
Click on CREATE VOLUME
Choose a name and size (in GiB),
(Optional) you can select to create a volume from a snapshot in the volume source drop-down
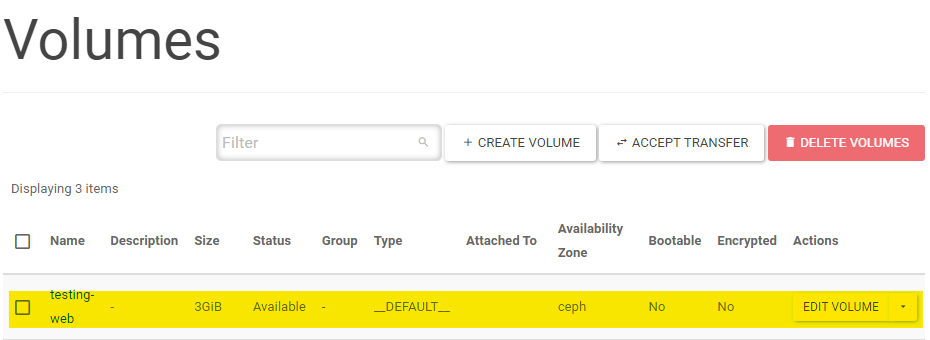
After creation, you will see the volume in the list
Command-Line
Note
See Using OpenStack Command-line Interface on how to set-up the command line client.
Create simple volume
Run the following command in Terminal
openstack volume create --size <size-in-GiB> <name>
Example
$ openstack volume create --size 3 tutorial-volume
+---------------------+------------------------------------------------------------------+
| Field               | Value                                                            |
+---------------------+------------------------------------------------------------------+
| attachments         | []                                                               |
| availability_zone   | ceph                                                             |
| bootable            | false                                                            |
| consistencygroup_id | None                                                             |
| created_at          | 2021-12-10T16:59:52.000000                                       |
| description         | None                                                             |
| encrypted           | False                                                            |
| id                  | 67c52d99-544a-4ea1-b8a7-eefdd7cb9df6                             |
| multiattach         | False                                                            |
| name                | tutorial-volume                                                  |
| properties          |                                                                  |
| replication_status  | None                                                             |
| size                | 3                                                                |
| snapshot_id         | None                                                             |
| source_volid        | None                                                             |
| status              | creating                                                         |
| type                | __DEFAULT__                                                      |
| updated_at          | None                                                             |
| user_id             | 3ae4ecf4b9e0e66260b7aaebc2cc98aac3c95221e42f1cb49113ed751d8b9f2c |
+---------------------+------------------------------------------------------------------+
Create image from snapshot/image
Find the ID of your snapshot
$ openstack volume snapshot list
+--------------------------------------+--------------------------------------+-------------+-----------+------+
| ID                                   | Name                                 | Description | Status    | Size |
+--------------------------------------+--------------------------------------+-------------+-----------+------+
| 76d51455-a5cd-478d-a93f-6e49b4108575 | testing-v-snapshot                   | None        | available |    3 |
+--------------------------------------+--------------------------------------+-------------+-----------+------+
Run the following command in Terminal
openstack volume create --snapshot <snapshot-id> --size <size> <name>
Example
$ openstack volume create --snapshot 76d51455-a5cd-478d-a93f-6e49b4108575 --size 3 test-cli-snapshot
+---------------------+------------------------------------------------------------------+
| Field               | Value                                                            |
+---------------------+------------------------------------------------------------------+
| attachments         | []                                                               |
| availability_zone   | ceph                                                             |
| bootable            | false                                                            |
| consistencygroup_id | None                                                             |
| created_at          | 2021-12-02T14:39:33.000000                                       |
| description         | None                                                             |
| encrypted           | False                                                            |
| id                  | 2d61791d-5f52-46e1-81ac-05221c308fe8                             |
| multiattach         | False                                                            |
| name                | test-cli-snapshot                                                |
| properties          |                                                                  |
| replication_status  | None                                                             |
| size                | 3                                                                |
| snapshot_id         | 76d51455-a5cd-478d-a93f-6e49b4108575                             |
| source_volid        | None                                                             |
| status              | creating                                                         |
| type                | __DEFAULT__                                                      |
| updated_at          | None                                                             |
| user_id             | 3ae4ecf4b9e0e66260b7aaebc2cc98aac3c95221e42f1cb49113ed751d8b9f2c |
+---------------------+------------------------------------------------------------------+
Attaching Volumes to an instance
You can only attach a volume to one instance at a time.
Web Interface
Log-in to the STFC cloud (https://openstack.stfc.ac.uk/)
In the Web Interface, Go to Compute → Instances
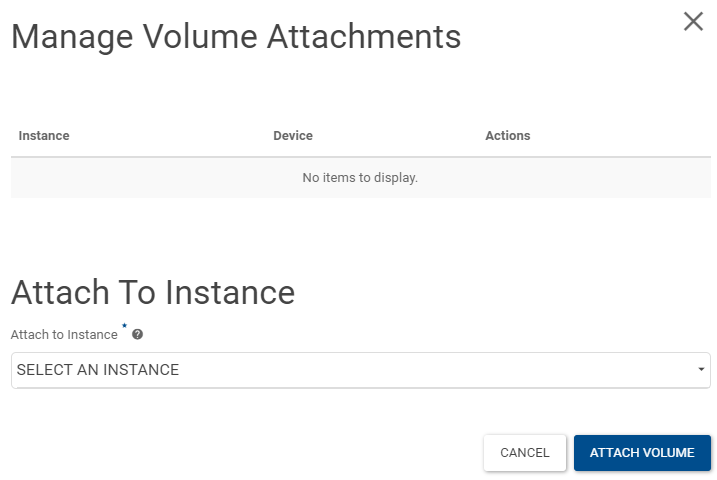
Click the drop-down menu on the right-hand side (in Actions column) and select MANAGE ATTACHMENTS
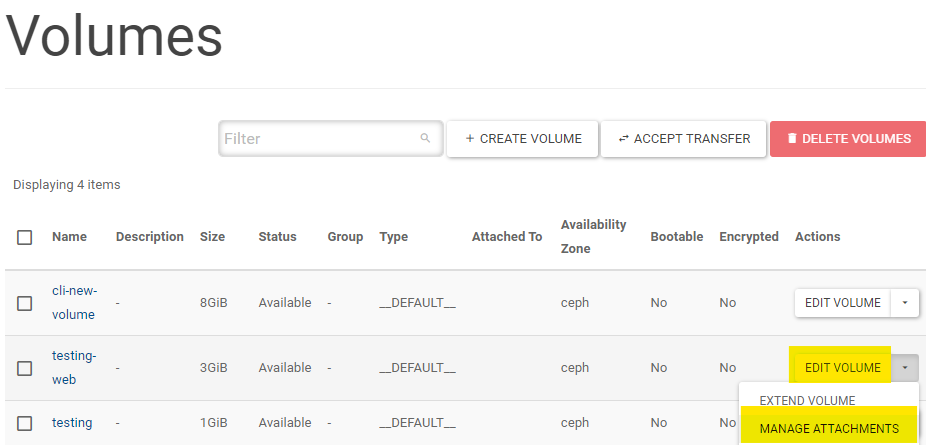
Select the right instance and press ATTACH VOLUME
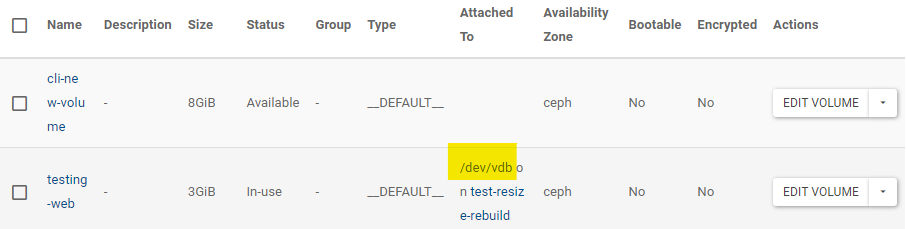
Note the path in the Attached To column of the volume
Command-Line
Note
See Using OpenStack Command-line Interface on how to set-up the command line client.
Get the
Server ID(Instances) andVolume ID(Volume) using command
$ openstack server list
+--------------------------------------+--------------------------+--------+----------------------------------------+---------------------------------------------------------+--------------+
| ID                                   | Name                     | Status | Networks                               | Image                                                   | Flavor       |
+--------------------------------------+--------------------------+--------+----------------------------------------+---------------------------------------------------------+--------------+
| 6b2bedc4-9d8e-4bf3-be63-1dd49bc2e188 | test-resize-rebuild      | ACTIVE | Internal=172.16.102.207                | ubuntu-focal-20.04-gui                                  | c3.small     |
+--------------------------------------+--------------------------+--------+----------------------------------------+---------------------------------------------------------+--------------+
$ openstack volume list
+--------------------------------------+-------------------+-----------+------+-----------------------------------+
| ID                                   | Name              | Status    | Size | Attached to                       |
+--------------------------------------+-------------------+-----------+------+-----------------------------------+
| 2d61791d-5f52-46e1-81ac-05221c308fe8 | test-cli-snapshot | available |    3 |                                   |
+--------------------------------------+-------------------+-----------+------+-----------------------------------+
Run
openstack server add volume <server-id> <volume-id> --device <device-name>
Example
$ openstack server add volume 6b2bedc4-9d8e-4bf3-be63-1dd49bc2e188 2d61791d-5f52-46e1-81ac-05221c308fe8 --device /dev/vdb
+-----------+--------------------------------------+
| Field     | Value                                |
+-----------+--------------------------------------+
| ID        | 2d61791d-5f52-46e1-81ac-05221c308fe8 |
| Server ID | 6b2bedc4-9d8e-4bf3-be63-1dd49bc2e188 |
| Volume ID | 2d61791d-5f52-46e1-81ac-05221c308fe8 |
| Device    | /dev/vdb                             |
+-----------+--------------------------------------+
Accessing the volume
In order to access the volume you must also mount the volume in the VM.
Log-in to the attached instance using
SSHUse
lsblkto confirm the device path (usually typedisk). The value shown in OpenStack can be inaccurate.
$ lsblk

NAME    MAJ:MIN RM  SIZE RO TYPE MOUNTPOINT
loop0     7:0    0 73.1M  1 loop /snap/lxd/21902
loop1     7:1    0 55.4M  1 loop /snap/core18/2128
loop3     7:3    0 72.6M  1 loop /snap/lxd/21750
loop4     7:4    0 61.9M  1 loop /snap/core20/1169
loop5     7:5    0 32.5M  1 loop /snap/snapd/13640
loop7     7:7    0 42.2M  1 loop /snap/snapd/14066
loop8     7:8    0 55.5M  1 loop /snap/core18/2253
loop9     7:9    0 61.9M  1 loop /snap/core20/1242
sr0      11:0    1  470K  0 rom  /mnt/context
vda     252:0    0   20G  0 disk
├─vda1  252:1    0 19.9G  0 part /
├─vda14 252:14   0    4M  0 part
└─vda15 252:15   0  106M  0 part /boot/efi
vdc     252:32   0    3G  0 disk
(Optional, only for new volume) Format the volume (we use
ext4here and assume the attach point is/dev/vdc) (Formatting will wipe your data):
sudo mkfs.ext4 /dev/vdc
Mount the volume (we use the folder /mnt/test-volume as example)
sudo mkdir /mnt/test-volume
Add this mount point to /etc/fstab, so it will be mounted automatically on startup
sudo vim /etc/fstab
Add/edit the following line:
/dev/vdc /mnt/test-volume ext4 defaults 0 0
You still need to manually mount it now
sudo mount /mnt/test-volume
(Optional)You may also want to change the permission of the directory using
chmodto enable read/write withoutsudo
Detaching Volume
You can detach a volume using both command-line and web interface.
Web Interface
Log-in to the STFC cloud (https://openstack.stfc.ac.uk/)
In the Web Interface, Go to Compute → Instances
Click the drop-down menu on the right-hand side (in Actions column) and select MANAGE ATTACHMENTS
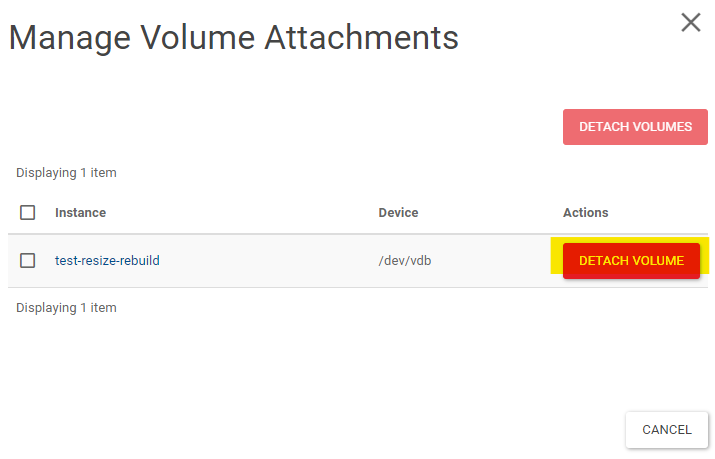
Click DETACH VOLUME
Command-line
Note
See Using OpenStack Command-line Interface on how to set-up the command line client.
Run
openstack server remove volume <server-id> <volume-id>
Example
$ openstack server remove volume 6b2bedc4-9d8e-4bf3-be63-1dd49bc2e188 2d61791d-5f52-46e1-81ac-05221c308fe8
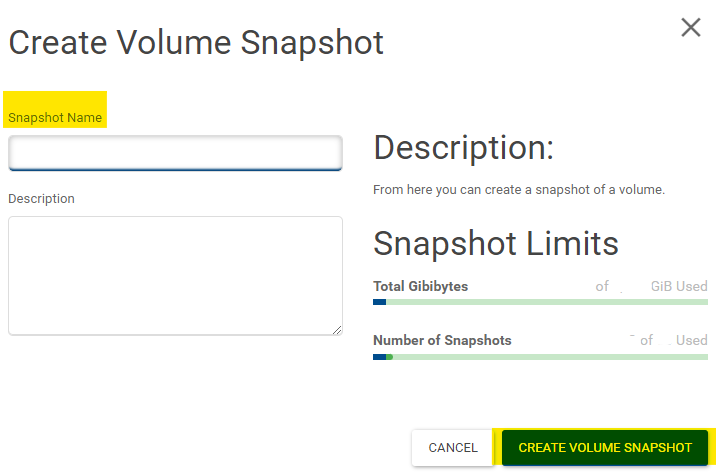
Create Volume Snapshot
Web Interface
Log-in to the STFC cloud (https://openstack.stfc.ac.uk/)
In the Web Interface, Go to Volumes → Volumes
Click the drop-down menu on the right-hand side (in Actions column) and select CREATE SNAPSHOT
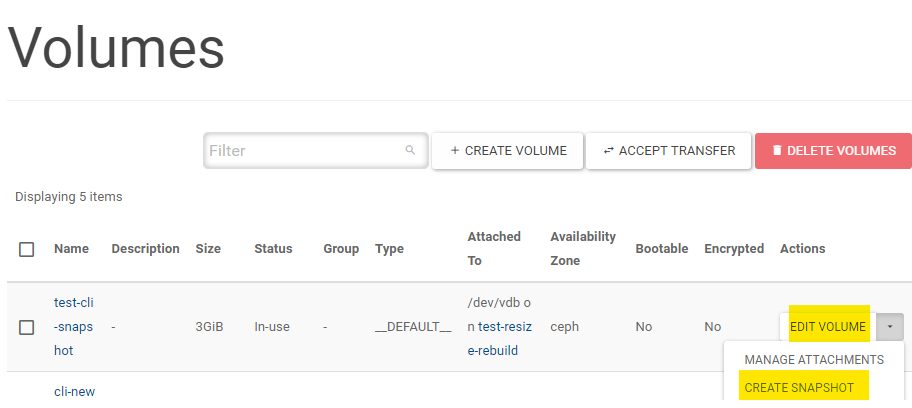
Give it a name and click DETACH VOLUME
Command-Line
Note
See Using OpenStack Command-line Interface on how to set-up the command line client.
Find the ID of the volume with
openstack volume list:
$ openstack volume list
+--------------------------------------+----------------+-----------+------+-----------------------------------+
| ID                                   | Name           | Status    | Size | Attached to                       |
+--------------------------------------+----------------+-----------+------+-----------------------------------+
| 03a5bb45-6c28-406d-8cd7-7fac5b63bdeb | cli-new-volume | available |    8 |                                   |
+--------------------------------------+----------------+-----------+------+-----------------------------------+
Run
openstack volume snapshot create --volume <volume-id> <name>
Example
$ openstack volume snapshot create --volume 8e20dbdd-16ee-40e9-84ed-971c12104b98 testing-v-snapshot
+-------------+--------------------------------------+
| Field       | Value                                |
+-------------+--------------------------------------+
| created_at  | 2021-12-02T14:34:48.718892           |
| description | None                                 |
| id          | 76d51455-a5cd-478d-a93f-6e49b4108575 |
| name        | testing-v-snapshot                   |
| properties  |                                      |
| size        | 3                                    |
| status      | creating                             |
| updated_at  | None                                 |
| volume_id   | 8e20dbdd-16ee-40e9-84ed-971c12104b98 |
+-------------+--------------------------------------+
Deleting Volumes
Warning
You should always refer to Create Volume Snapshot as this process is not reversible and may result in data loss.
Web Interface
Log-in to the STFC cloud (https://openstack.stfc.ac.uk/)
In the Web Interface, Go to Volumes → Volumes
Select the volume you wish to delete and click DELETE VOLUME
Confirm by clicking DELETE VOLUMES
Command-Line
Note
See Using OpenStack Command-line Interface on how to set-up the command line client.
Find the volume ID with
openstack volume list
$ openstack volume list
+--------------------------------------+-------------------+-----------+------+-----------------------------------+
| ID                                   | Name              | Status    | Size | Attached to                       |
+--------------------------------------+-------------------+-----------+------+-----------------------------------+
| d04f368d-7d60-4843-8f76-dbe61e73f9ee | delete-v-cli      | available |    1 |                                   |
+--------------------------------------+-------------------+-----------+------+-----------------------------------+
Run
openstack volume delete <volume-id>
Example
$ openstack volume delete d04f368d-7d60-4843-8f76-dbe61e73f9ee